
Python GUI: Build Your First Application Using Tkinter


Python GUI: Build Your First Application Using Tkinter


INTRODUCTION:-


A graphical user interface (GUI) is a desktop interface that allows you to communicate with computers. They carry out various activities on desktop computers, laptops, and other mobile devices. Text-Editors and other graphical user interface applications build, read, download, and erase various types of files. You can also play games such as Sudoku, Chess, and Solitaire through these apps. Google Chrome, Firefox, and Microsoft Edge are examples of graphical user interface (GUI) Internet browsers.

Python has a variety of libraries, but these four stand out, especially in terms of GUI.  

  • Tkinter 
  • Kivy 
  • Python QT 
  • wxPython

Tkinter is the first option for a lot of learners and developers because it is quick and convenient to use. Tkinter is a Python library that can be used to construct basic graphical user interface (GUI) applications. In Python, it is the most widely used module for GUI applications.

Next up, let’s get started with Tkinter.

WHAT IS TKINTER?

Tkinter is a standard Python library for creating graphical user interfaces (GUIs). It provides a set of tools and widgets for building desktop applications with a graphical interface. Tkinter is based on the Tk GUI toolkit and is included with most Python installations, making it readily available for developers.

Here's a brief overview of how to use Tkinter:

Building Your First Python GUI Application With Tkinter

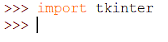
To start building your application Tkinter, the first step is to install the Tkinter module in the python shell.

PythonGUI_1

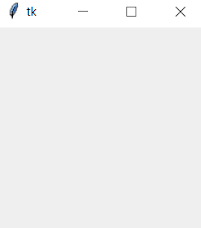
The next step is to open a window in Tkinter. The below code will open a window instance on your system.

PythonGUI_2

The above code will open a window like the one given below. Please note that the appearance of the window will depend on your operating system.

PythonGUI_3

Here you can create you first GUI using python.


Comments

Popular posts from this blog

GUI of a chatbot using streamlit Library

GUI of an AI chatbot  Creating a GUI for an AI chatbot using the streamlit library in Python is straightforward. Streamlit is a powerful tool that makes it easy to build web applications with minimal code. Below is a step-by-step guide to building a simple AI chatbot GUI using Streamlit. Step 1: Install Required Libraries First, you'll need to install streamlit and any AI model or library you want to use (e.g., OpenAI's GPT-3 or a simple rule-based chatbot). If you're using OpenAI's GPT-3, you'll also need the openai library. pip install streamlit openai Step 2: Set Up OpenAI API (Optional) If you're using OpenAI's GPT-3 for your chatbot, make sure you have an API key and set it up as an environment variable: export OPENAI_API_KEY= 'your-openai-api-key' Step 3: Create the Streamlit Chatbot Application Here's a basic example of a chatbot using OpenAI's GPT-3 and Streamlit: import streamlit as st import openai # Set the OpenAI API key (...

Unveiling the Power of Prompt Engineering: Crafting Effective Inputs for AI Models

  Unveiling the Power of Prompt Engineering: Crafting Effective Inputs for AI Models In the rapidly evolving landscape of artificial intelligence (AI), prompt engineering has emerged as a crucial technique for harnessing the capabilities of language models and other AI systems. This article delves into the essence of prompt engineering, its significance, and best practices for designing effective prompts. What is Prompt Engineering? Prompt engineering involves designing and refining input queries or prompts to elicit desired responses from AI models. The effectiveness of an AI model often hinges on how well its input is structured. A well-crafted prompt can significantly enhance the quality and relevance of the model’s output. Why is Prompt Engineering Important? Maximizing Model Performance: Well-engineered prompts can help models generate more accurate and contextually relevant responses, making them more useful in practical applications. Reducing Ambiguity: Clear and precise p...

Kubernetes deployment within an ec2 instance

Kubernetes within an EC2 instance, We have to follow these steps:- Set up the EC2 instance with Kubernetes. Create a Kubernetes Deployment YAML file. Apply the deployment using kubectl . Below is a guide and code to accomplish this. Step 1: Set Up EC2 Instance with Kubernetes Launch an EC2 Instance : Choose an Amazon Linux 2 AMI or Ubuntu AMI. Select an instance type (t2.micro is fine for small projects). Configure security groups to allow SSH, HTTP, HTTPS, and any required Kubernetes ports. Install Docker : SSH into your instance and install Docker. sudo yum update -y sudo amazon-linux-extras install docker -y sudo service docker start sudo usermod -aG docker ec2-user For Ubuntu: sudo apt-get update sudo apt-get install -y docker.io sudo systemctl start docker sudo usermod -aG docker ubuntu Install Kubernetes (kubectl, kubeadm, kubelet) :s sudo apt-get update && sudo apt-get install -y apt-transport-https curl curl -s https://packages.cloud.google.com/apt/doc/apt-key.gpg | s...